Showing posts with label in. Show all posts

Thursday, September 29, 2016

How to download and play Pokemon GO if its unavaliable in your country

How to download and play Pokemon GO if its unavaliable in your country


Pokemon Go is currently officially available in New Zealand, Australia, United States, Canada and Germany. So, most of the Android and iOS users still dont have access to this game and we still dont know when it will be released in the remaining 200 or so countries filled with millions of more Pokemon fans. If you are impatient, there is actually a way to install and play Pokemon Go right now in countries where it is not available yet. Users in Brazil, Korea, Japan, India, Hong Kong, Nepal and more will be happy to try this method out. So if you are one of those Pokemon fans, who has been frantically searching Pokemon Go on Google Play Store or iTunes App Store  everyday, this post is for you.

Installing Pokemon Go on iphone and Android in unsupported countries


After the recent launch of Pokémon Go on iPhone and Android devices, it has take the world by storm. Pokemon Gos augmented reality gaming requires you to actually get out and search for Pokemon around your area and beyond. As your experience level increases you will be able to catch more powerful Pokemons, battle and take over your enemys teams and become the ultimate Pokemon Master. The game is highly addictive and like most Pokemon fans you too will be saying "gotta catch em all". The success of this game has skyrocketed Nintendos stock prices and now its worth billions of dollars more than before.

The direct installation method is easy. You just have to download the apk installation file and directly install the game instead of via Google Play Store. Then simply open your game and you are good to go. Pokemon Go does require you to turn on GPS and mobile data, which is likley to drain your phones battery faster than usual. On the plus side, the mobile data usage seems to be very reasonable and less than most other apps and games.

How to Install Pokemon Go on any unsupported countries: Android

  • Download Pokemon Go Apk from here: Pokemon GO APK installation
  • Before installation make sure installation from unknown sources are allowed. To do this, go to Settings >> Privacy (or Security) >> Scroll down and tap on Unknown Sources to allow installation of apps from unknown sources.
  • Now go to downloads and tap on the apk file you downloaded in step 1 and install Pokémon Go.


Now open Pokemon GO and it will prompt you to turn on GPS. Turn on GPS and WiFI or mobile data. You can sign in by using your Google account. Next, select/edit your avatar and type your nickname. Now the game will start and the first thing you will see is your avatar on a map. The map is extracted from Google Maps so it will be the real map of your area. As you move, so will your character. You will most likely find a couple of Pokemons nearby right away. More Pokemons will be placed further away. You can check your map and start hunting Pokemon. An important tip: Play safe and responsibly, do not trespass others properties, do not go chasing Pokemons on the highway or in the middle of the street and do not jump off a cliff if you see a Pokemon there.  

How to Install Pokemon Go on any unsupported countries: Android

  • On your iPhone, logout from App Store. Go to settings >> tap "Apple ID" and sign out
  • Now from settings >> General >> Language and Region, set your region as Australia, USA ,Germany or any region where Pokemon Go is available. 
  • Open App store and search "Pokemon GO" and download it.
  • If you don;t see it, you have to create a new Apple ID. While creating new Apple ID, make sure that your address is that of New Zealand, Germany, USA, Canada or any address where Pokemon Go is officially available. You can even use this Fakenamegenerator tool to generate a bogus Personal info of a U.S resident. 
  • Now go back to  iTunes App Store and Pokemon GO will be available.

After Pokemon Go is officially released in your region, you can switch back to your original Apple ID.


download now

Read More

Wednesday, September 28, 2016

How to fix Warning Camera failed error in Galaxy S7 Edge S6 and S5

How to fix Warning Camera failed error in Galaxy S7 Edge S6 and S5


Barely after 2 months of purchase, my Galaxy S7 Edge got the “Warning: Camera Failed” error that would not allow me to take any photos. Every time I opened the camera app, the screen would go black and give the camera failed warning error. The 12MP, f1.7 lens on Galaxy S7 is one of the best smartphone cameras today and it can even replace your digital cam or even DSLR for normal
Error message after opening Camera app on Samsung Galaxy S7
everyday shots. So, I was bummed when this awesome camera stopped working. Fortunately, this isn’t a hardware fault but an Android software bug common among Samsung Galaxy smartphones. I have listed below all the methods to fix Warning camera failed error on Samsung Galaxy S7, S6 and S5 phones. The method are lined up in the order of their effectiveness as reported by users.

Solutions: Camera failed problem on Galaxy S5, S6 and S7 Edge – Samsung Galaxy Camera app troubleshooting


Method 1: Disable “Smart Stay” feature

Smart stay basically detects your face and keeps the screen on when you are looking at it. So, this isn’t really a feature you need because you can increase the screen on-time or simple tap on the screen to keep it awake. This feature seems to conflict with the camera app of Samsung devices resulting in failed camera error.

  • Go to Settings >> Display >> Turn off “smart stay”
  • Reboot your phone


Method 2: Reset settings:

Resetting app settings is the second most effective solution to camera failed error in Samsung Galaxy devices.

  • Go to Settings >> Scrool down and select “Backup and Reset”
  • Select “Reset Settings” >> Tap “Reset” (Do not select “Factory Reset”)

Now your Samsung app settings will be reset to default and this will fix the Warning: Camera failed error on your Galaxy S7 edge, S6 or S5 smartphone. After this method, you will also need to again add your saved Bluetooth devices and re-enter your Wi-Fi password.


Method 3: Clear data of the Camera app

The clearing cache and data is the most widely used method for fixing Google Play Store related error codes. This might also solve camera app errors.

  • Go to Settings >> Applications >> Application Manager
  • Select “Camera” >> Force stop >> Tap Storage >> Select “Clear Data”
  • Tap “Delete”

Now open the camera app and try taking a picture. If you still get the “Warning: Camera Failed” error message, proceed to the next method.


Method 4: Wipe Cache Partition

Another method to fix Android firmware issues after an update, is to “wipe cache partition” from bootloader.
  • Turn your phone off
  • Hold power key + home key + volume up at the same time to bring up the bootloader
  • Once you reach the bootloader menu, use the volume key to highlight “wipe cache partition”
  • Press power button to select that option.
  • Now reboot system

Hopefully the Samsung Galaxy smartphone camera failed warning will be fixed by one of the methods. If you have alternative solutions, drop us a comment below.

download now

Read More

How to Fix Error 505 in Google Play Store

How to Fix Error 505 in Google Play Store


The Error 505 is a Google Play Store error in Android 5.0 Lollipop and KitKat 4.4. Some apps affected by Error code 505 include Google Play Games, Asphalt 8, Hearthstone, The Walking Dead, Clash of Clans and so on. The fix involves running a simple ADB command in Android SDK, we will come to that later. Many got this error due to the Adobe Air app. So you can try uninstalling the app. This error has been fixed on the latest versions of Android Lollipop so you can also update your version of Lollipop to 5.1 or later to fix it.

This is actually a permission error so clearing cache method may not work. But you can still give it a try. First, clear the cache and data for Google Play Store and Google Service Framework. These methods are explained in detail here: RPC-S:7/RPC-S:5 and Error 963. If those solutions didnt help, try the steps below to fix Google Play Error 505 while installing or updating apps:

How to fix Error 505 in Google Play Store during app download


Method 1: Uninstall conflicting app(s)

If you have multiple apps installed to perform similar function, then the -505 error code maybe caused because those apps are trying to access the same system settings. For example- you may have multiple banking apps installed and both will try to use similar payment settings and protocols. And when these apps are conflicted error 505 is caused. To resolve this issue, simply uninstall the first app and use the other one and vice versa.

Method 2: Uninstall/Re-install

First completely uninstall all the apps that are getting this error in Google Play.  For example if your Blizzard apps are facing error 505, uninstall all of them and reinstall. Also, you may have installed some Android apps from the Amazon store- try uninstalling them and re-installing them via Google Play Store.

Error Formats:  
  • Unknown error code during application install "-505"
  • "Hearthstone: Heroes of Warcraft" cant be installed. Try again, and if the problem continues, get help troubleshooting (Error code: -505)
screenshot- (Error code: -505) while installing Google+ in Google Play

Method 3: ADB Uninstall


Before you begin the steps you have to install the Android SDK on your PC, connect your Android device and perform an ADB uninstall for the app package thats causing the error.

The ADB tool is inside the platform-tools folder inside Android SDK folder. You will have to open command prompt. For Windows users: Start>> in the search box type cmd >> right click and select "Run as Administrator"

From inside the command prompt,  navigate to Android SDK folder. Now you can run the ADB. uninstall command.

After youve installed the Android SDK and appropriate USB drivers follow these steps:
  • Perform an ADB uninstall for the app package thats causing the error.  App packages are in this format: com.xx.xx. You can check the app package name by going to Android >> data folder inside the internal memory of your Android device.  
    • For example to remove chrome package from your device, the command is: adb uninstall com.android.chrome.
running adb uninstall command in Android SDK
  • After successful uninstall you will see a message that says, "success"
  • Now reinstall or update the app (or game) from the Play Store


Hopefully the above step gave you some idea about how to fix this issue. If nothing worked you may have to factory reset your device. If you have a better solution for the unknown error 505 please let us know about it in the comments.

download now

Read More

Tuesday, September 27, 2016

Hacking a Website Using Android phone in your hand

Hacking a Website Using Android phone in your hand


Hello everyone, today I will be 
teaching you how to hack a website using your android phones. Surprised and you might be thinking hows it possible to hack using your android mobile phone. Mostly 70% of the websites which are defaced by the hackers are done using the most common vulnerability i.e. SQL Injection.

We will be using an application called DroidSQLi to hack SQL injection vulnerable websites with our phone. So all we need are 3 things.
1.) DroidSQLi application installed on our android phone
2.) SQLi vulnerable website
3.) and obviously an android phone.

Lets get started, first of all download DroidSQLi Tool. It is an first automated SQL Injection exploitation tool for mobile phones. It supports the following type of injections.

Union Based Injection
Blind Injectin
Error Based Injection
Time Based Injection

All you need to do is enter the vulnerable website under Target URL and press on inject button. It will automatically select the best possible injection.


This post is By Hacker  Sachin Rastogi , follow for latest feeds

download now

Read More

How to Fix Error 500 in Google Play Store

How to Fix Error 500 in Google Play Store


Google Play Error 500 is an Android app download error that many Clash of Clans users are experiencing on their Android devices running older OS like 4.2 or 4.3 JellyBean. Relatively newer OSs like Android 4.4 KitKat and 5.0 Lollipop is also affected by this bug but not as widely as the older versions. Due to error 500 in Google Play Store, users cant download or update any Android apps. Sometimes this error code pops up during installation and even after the app has been completely downloaded. This is the exact format of the error message- "Clash of Clans" could not be downloaded due to an error (500).

Other apps affected by this Play Store bug includes YouTube, Facebook, WhatsApp, Viber and other apps. Normally this issue is caused by a slow internet connection so you can try waiting for your Wi-Fi to get back to its normal speed or you can try connecting to a different network. If the app youre , try downloading the app on mobile data.  Turn Wi-Fi off and turn it back on and try the installation. If that didnt fix  Error 500 in Google Play Store, then try the steps below:

How to fix error 500 in Google Play Store

Clash of clans game poster

Note: This fix works for any app or game causing error code 500.

Method 1: (For update error)
  • Sync Game data to Google Play Store (Settings >> Accounts >> choose ur gmail)
  • Totally uninstall Clash of Clans or any app thats causing error
  • Then reinstall it from Google Play Store


Method 2: Clearing Cache & Data
  • Go to Settings >> Apps >> swipe and go to "All" tab
  • scroll down and select "Google Play Store" >> Select "Clear Cache" and "Clear Data"
  • similarly, clear cache and data for "Google Play Services"
  • reboot (optional)
  • open Google play and try to download or update the app or game

Method 3: Remove and add back your Google account

This is a very common error fix used to solve Google play Error 927, Error 963, and Error 907.  In this method you will have to remove your Gmail account from settings >> Accounts >> Google >> press menu and select  "Remove account". After that simply adding the same account back will fix the app download/update error.


Let us know if the above steps fixed Google Play Store Error 500 in your Android smartphone or tablet. If you have any other solution or fix, let please drop a comment and help us out.


download now

Read More

How to fix error 923 in Google Play Store

How to fix error 923 in Google Play Store


The Error 923 is a Google Play Store error which prevents Android users from updating or downloading apps and games. The error message looks like this: "Viber" could not be downloaded due to an error (923). Popular apps affected by this Google Play Store bug include Facebook, Clash of Clans, Hearthstone, Whatsapp and Subway Surfer.  While I’m not sure what Android error code 923 exactly means, in order to fix it, you will use the cache clearing method, which has been used to solve other common Android market errors like RPC:S-7 and the infamous “unfortunately app has stopped error”. Users will keep getting this error until they clear the cache and data for some Google processes. Here are a couple of fix for Error 923 in Google Play Store:


Similar Error: Fix Android Error 924 on Google Play

How to Fix Error 923 in Google Play Store 

First Method : Clear Google app cache


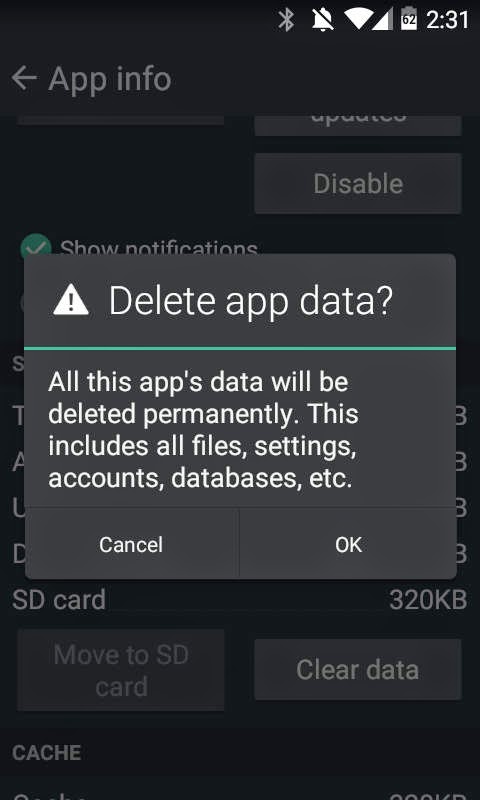
Clearing App Cache to fix 923 error in AndroidClearing App Cache for Google Play Store


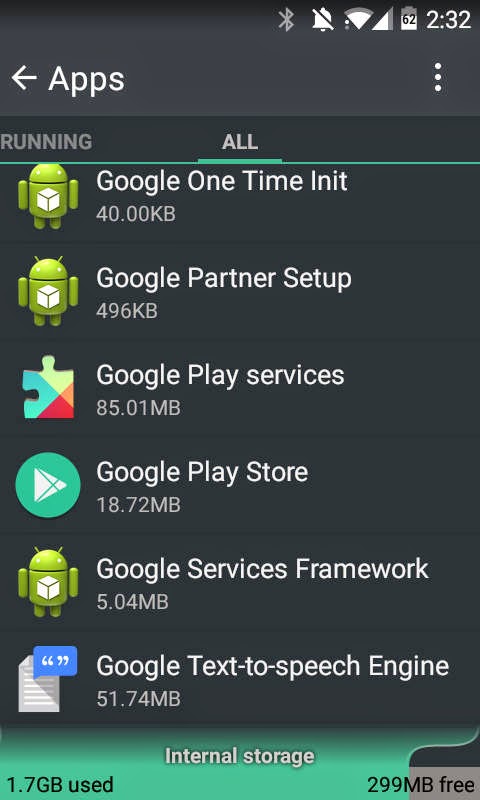
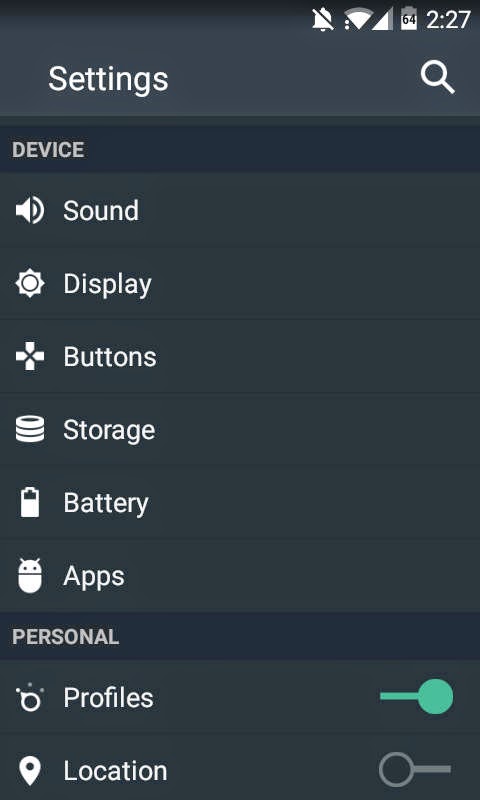
  • Go to Settings >> Apps >> Swipe left to see “All” apps list
    • Scroll down and select “Google Play Store” 
    • Select “Force stop” and then “Clear Data” >> Select “Ok”
  • Go to Settings >> Apps >> Swipe left to see “All” apps list
    • Scroll down and select “Google Play Services” >> 
    • Select “Force stop” and then “Clear cache” >> Select “Ok”
  • (optional) Again go back to “All” app list 
    • Scroll down and select “Google Play Framework” >> 
    • Select “Force stop” and then “Clear Data” >> Select “Ok”


Once above steps are completed, open Google Play Store, add you Gmail account information and start downloading apps and games.

Second Method: Clear System Cache

Android_Settings
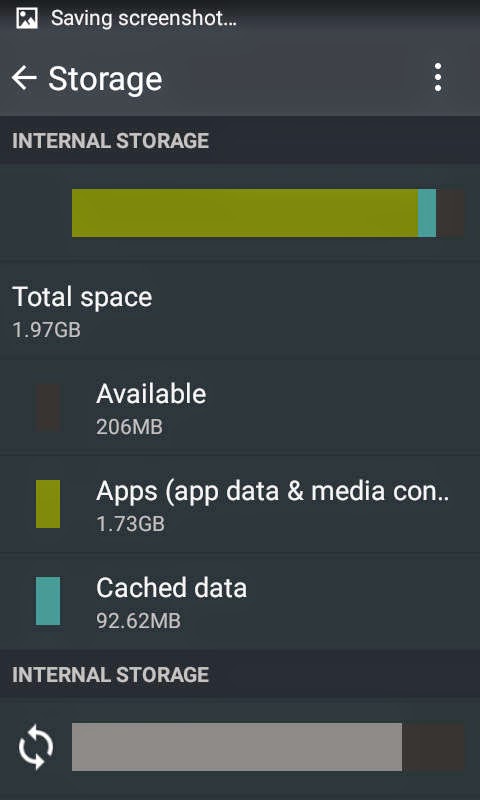
Clearing System Cache to Fix error 923 in Android Play Store


  • Go to Settings >> Storage
  • Tap on “Cached Data” under Internal Storage
  • Press “OK” to clear cache
  • Now reboot and try to install the App from the Google Play Store


I hope the above solutions helped resolve this error for your Android Smartphone or tablet. If you have any other 923 error fix, please mention them in the comments.


Note that this error is common mostly in the Jelly Bean operating system so if you update to the latest Android 4.4 Kit Kat or Android 5 Lollipop, you may stop getting this error. Some devices which have been affected by the 923 error include Moto G, Samsung Galaxy S5, Galaxy S4, Galaxy S3, Galax S2, Nexus 4, Nexus 7, HTC One X, LG L5.  Many users have complained of the 923 error while to download Whatsapp, Facebook, Blackberry Messenger etc.


download now

Read More

Monday, September 26, 2016

How to shoot RAW photos in LG G4 G3 G5

How to shoot RAW photos in LG G4 G3 G5


The best feature of LG smartphones like G4 and G5 is its camera, and what makes it special is its ability to shoot photos in RAW format. Taking pictures in RAW will give photo editors incredible amount of control to tweak their images and improve its overall quality via powerful editing tools like Adobe Lightroom. Many new LG smartphone users have a hard time finding the option to enable RAW mode in LGs camera app.

To enter RAW mode, you will first have to switch from automatic to manual camera mode. This is very easy, simply open your camera app and then tap in the menu icon (three dot vertical line) on the top left. Now, tap "Manual". After youre in manual mode, on the left taskbar you will see a "JPG" icon. Tap on it and now it will switch to "RAW JPG".  Now you are ready to shoot photos in RAW format.
Switching to manual mode

LG G4/G5 Camera app RAW shooting mode
Enabling RAW JPG shooting 
Before you start using the RAW mode, you should learn the basics of manual shooting. It is very easy to learn. Just play with the available settings that include WB(white balance), MF(manual focus), exposure (+/-), ISO and shutter speed (S). On brighter environment you will need to lower the ISO and the shutter speed. On a more darker setting or dimly lit indoor environment, experiment with higher ISO and lower shutter speed. Too much ISO, while brightens the image, can increase noise. Note that when you increase the shutter speed, your cameras shutter will open for a long time to let more light in and takes more time to snap a photo. So you will have to hold the camera very steady while shooting with low shutter speed. The white balance is used to change the color tone from cool to warm- use it to get the most natural color for your photos during different weather and lighting conditions.


The LG G4 and G5 with its f 1.8 aperture camera, is able to take excellent night shots. You can take amazing night shots by using a small smartphone tripod. Just play with the manual settings and you will become a pro LG smartphone photographer in no time.  

download now

Read More

Sunday, September 25, 2016

How to fix error 920 in Google Play Store

How to fix error 920 in Google Play Store


The error 920 is another common Google Play Store related error. This bug prevents you from downloading or updating your apps & games from the Android market. This issue is also common in in Cyanogenmod based devices like OnePlus One. The fix for error 920 is the same as that of error 963 and the infamous error RPC:S-5:AEC-0.  All you need to do is clear some cache and delete/re-add your Gmail account in the settings. First thing youd want to try is rebooting (restarting) your android device and then installing the app causing the error. If that didnt work,  here are the simple steps to resolve or fix error 920 in Android Google Play Store:

How to Fix App Error 920 in Google Play Store  

Update for "Gmail" could not be downloaded due to an error. (920)


Method 1: Uninstall and Re-install the app or game causing error
  • go to Settings >> Apps >> All
  • scroll and find the App giving the error 920 >> Select "Uninstall" 
Method 2: Clearing Cache and Data 
  • go to Settings >> Apps >> All
  • scroll down and select "Gogle Play Store >>  Clear Cache and Clear Data
  • open Google Play Store and try to download/update the app or game


Method 3: Removing and re-adding Google account
  • go to Settings >> Accounts >> Select "Google"
  • select your Gmail account 
  • Press menu and select "Remove acccount"
  • optionally, do a reboot
  • Again, from Settings >>  Under "Accounts" >> select "Add account" >> Select "Google"
  • Now simply add back your Gmail account deleted earlier
  • Open Google Play Store and download or update the app  

One of the above three methods have worked perfectly for most users. The third method is popular but first two are shorter so you could give them a try. Did this fix solve error 920 for your Android? Let us know along with your device model and operating system. HTC One,  Galaxy S4, Nexus 5 users have widely reported this error. Whatsapp, Facebook, Gmail app installation are also frequently affected by this error. 

If you have an alternative or a more permanent solution, drop it in the comments. 


Related Error:
Unknown error code during application install: "920"


download now

Read More

Where can you get repair powder in Dark Souls II

Where can you get repair powder in Dark Souls II


How to get repair powder in Dark Souls II

In Shaded Woods(Ruins) area of Dark Souls 2, there is place with a giant hole on the ground. When you fall through it you will enter a small cave which has acid pits. At first I didn’t know it was an acid pit so I stepped on it and as a result my equipment were damaged. My ring of restoration and ring of blades were completely broken. However, it did manage to save some of my  by using the repair powder on time and then carefully avoiding those pits to make my way out of that cave. I found out later that the damaged stuffs could also be fully repaired by simply resting at the bonfire. However, the ones that were totally wrecked could only be repaired by the Majula Blacksmith (Lenigrast). After this brief yet surprising incident, I went looking for more repair powder so that I can use it later if needed. So where can you get repair powder in Dark Souls II? Where do you buy it?


Note that the repair powder doesn’t fully restore your items and it doesnt work if it’s totally broken. It restores 30 durability to weapons, 50 to armor, 20 to rings. A lot of people have problem finding repair powder but you can find it in many places and also buy it from NPCs like the Blacksmith and Steady Hand McDuff. However, for infinite repair powder you will need to reach the Drangleic Castle and then talk with the merchant named Chancellor Wellager. The Drangleic Castle area is pretty far in the game though. 

Locations of repair powder in Dark Souls 2
Repair-Powder-Locations-Dark-Souls-2

  •  x1 purchasable from Blacksmith Lenigrast in Majula for 2,500 souls
  • x1 found on a corpse in Lost Bastille after riding on top of the elevator down near the entrance from No Mans Wharf
  • x1 purchasable from Steady Hand McDuff in Lost Bastille for 2,500 souls after you give him the Dull Ember
  • x1 in a chest in No Mans Wharf
  • x1 sold by Magerold of Lanafir for 2500 souls.
  • x1 found on a corpse in Iron Keep along with a Soul of a Proud Knight.
  • x5 In Drangleic Castle in the shortcut near the Mastodon Knights, Syan Knights and Archers (near Central Castle Drangleic Bonfire). The room also contains an Estus Flask Shard and 10 Flame Butterflies (It is possible to run past all the knights, however keep in mind that two Syan Knights will follow you in there, and the only way out is by not only pulling a lever, but by opening a door, so prepare to turn around and engage in a 2v1 fight).
  • Rare drop from Grave Wardens in Undead Crypt
  • Dropped by the rats in Grave of Saints
  • Dropped by Sanctum Knights in Dragons Sanctum
  • Infinitely purchasable from Chancellor Wellager in Drangleic Castle, for 2,500 souls each.
Source: Dark Souls 2 Wiki


download now

Read More

Saturday, September 24, 2016

How to Fix Error Code 504 in Google Play Store

How to Fix Error Code 504 in Google Play Store


The Error 504 is a Google Play Store gateway error that occurs due to slow internet connection on your Wi-Fi or mobile data. This is the error message I received while trying to install Facebook via Google Play store: Cant install app. "Facebook" cant be installed. Try again, and if the problem continues, get help troubleshooting. (Error code:- 504). One of the signs of a slow connection is slow loading of normal webpages. Try opening google.com on your Android browser, if it takes longer than normal to load the page, then your connection is slow and when you try to download or update large Android apps or games in such a connection, you will get the unknown error code 504 in Google Play. Users have reported this error while trying to update/download apps like Facebook, Chrome, Titanium Backup, Viber and so in google Play.

This error generally occurs while downloading or updating apps while the internet is slow. This issues has affected many android devices running different OSs like JellyBean 4.2, KitKat 4.4 and Lollipop 5.0. Most of the time, Google Play Store error 504 goes away once your network is back to normal. If youre getting this error despite a normal internet speed try the following method to fix error code 504 in Google Play Store:

How to Fix Google Play Store Error 504 during app install & update

App cant be installed Error Code -504 in Google Play Store
Google Play Store Error Code: -504 while installing Facebook 

Method 1:Turn off and turn on Wi-Fi

This is basically to see whether your wi-fi is working as normal. 
  • First turn off your router, wait for 30 secs and then turn it back on
  • Now, turn off your smartphone or tablets wi-fi and then turn it back on
  • Connect to your Wi-Fi network
  • Open Google Play and try to update/install the app

Method 2: Turn off and turn on mobile data

Sometimes the problem can be with your home or office internet connection. You can simply turn on mobile data and try to download and install your app from Google Play Store. However, some mobile service providers charge high fees on mobile so only use mobile data if you can afford it. If your device is still unable to connect via mobile data, turn it off and on and check. 
  • You can turn off mobile data or the entire network via Aeroplane mode in the quick settings
  • If you dont know how to use Aeroplane mode, go to Settings >>Mobile Networks >> Disable Data
  • Now turn your mobile data back on and try to run the installation

Method 3: Clearing Cache and Data of Google Play Store


This is the most used method for fixing many Google Play Store error codes and error messages.
  • Go to Settings >> Apps >> Swipe and select "All"
  • scroll down and select "Google Play Store" >> Clear cache and Clear Data
  • again, from "All" >> scroll down and select "Google Service Framework" >> Clear Cache and Clear Data
  • Now, open Google Play Store and update or download your app or game 
Related: How to fix com.android.vending has stopped Google Play error

Please note that the above methods might not work for everyone but they have worked for most. Most of the times, this error just automatically resolves after your network speed is normalized. If you have other possible  solutions for the 504 Error in Google Play Store please let us know in the comments. 

download now

Read More

How to check your laptop battery health in Windows 10

How to check your laptop battery health in Windows 10


Is your laptops battery draining faster than normal? For example- your battery used to last 5 hours but now barely an hour. Or,the battery indicator shows sudden or sharp drop in the percentage remaining. Sometimes even new laptop batteries can show such signs. Did you get a faulty battery or an old one with a very low capacity? So how do you check if your battery is in working condition or is it really damaged and needs to be replaced? If youre a Windows user there no need to install a separate program for this because Windows has a simple command that helps you easily check the condition or health status of your laptops battery.

How to checking laptop battery Condition in Windows 10


  1. Click Start >> Type CMD in the search bar
  2. Right click on "Command Prompt" and select "Run as administrator"
  3. Now in the command prompt type cd %userprofile%/Desktop >> Press Enter
  4. Type powercfg -energy >> Press Enter 

After a few minutes the command will generate an energy-report.html file, which will be saved on your desktop. Simply head to desktop and then open that file. The energy report has full information about your Laptop. However, you dont need to go through all of that to check the battery health. Simply scroll down and find a section called "Battery Information". For simplicity press ctrl+F and then type "Battery Information" in the search bar.


The things you should look at are the(Factory) Design capacity and Last Full Charge values. If your Last Full Charge is closer or not very low compared to the Design capacity, then your battery is in good condition/health. However, if its too low then your battery is in poor health and needs to be replaced because it cannot hold charge at its design capacity. For example- in the picture  above you can see Design Capacity is 47520 but the Last Full Charge is 2610. This indicates your battery now holds a maximum of only 5.5% charge of the original capacity. This battery barely lasts 15 minutes.


download now

Read More

Friday, September 23, 2016

How to Change Colors in the Start Menu Taskbar and Title bar Action Center in Windows 10

How to Change Colors in the Start Menu Taskbar and Title bar Action Center in Windows 10


Since the presence Anniversary Update (Build 14 316), Microsoft provides many small tweak tweak the personalization. Such as the option to change the look into dark mode in Modern Apps.

In addition, Microsoft also gives users the option to customize the color accent to a few places, Start Menu, Taskbar, Action Center and the titlebar. Here are the steps.

Changing the Start Menu, Taskbar, Action Center and the titlebar

First go to Settings (Winkey + I). Then navigate to his Personalization - Colors. Scroll down until you find the option Show color on Start, Taskbar, and action center. If it had been a slide from Off to On on the option. That way you will provide color in the Start, Taskbar, and Action center.


Then for the Title bar, slide from Off to On option Show color on the Title bar that is located just below the previous option. That way you will change the color of each window titlebar (only on Win32Apps).


Anda the result is bellow


download now

Read More

How to Fix 0x803f8001 error in Windows 10 Store

How to Fix 0x803f8001 error in Windows 10 Store


Windows 10 upgrade have brought new life to many devices- even ones with really old hardware dating almost 8-9 years. The new Win 10 combines the best features of Windows 8.1 with the user friendly interface of Windows 7. However, not al would agree with this and many have stuck to Windows 7 and some have even rolled back to Win 7 after experience some bugs in Windows 10. One of the common bugs cause apps like MSN Food, MSN health, MSN news, Get Skype, Get office, Phone companion etc to crash and giving the 0x803f8001 error while trying to update or download in the Windows Store. Basically, users cannot install any app or game from the store. Read below to find out how to Fix 0x803f8001 error in Windows 10 Store

How to Fix 0x803f8001 error in Windows 10 Store

Method involved: Uninstall and Re-install apps causing error: For example let’s say the “Get Skype” app is giving you the error 803f8001. To fix this
  1. Click start >> Type “Get Skype” in the search bar
  2. Right Click “Get Skype” from the search results
  3. Select “Uninstall” and wait for a few minutes to ensure its uninstalled
  4. Now open Windows Store (type “Store” in search bar)
  5. Search “Skype” and re-install
  6. Repeat the same steps for other apps affected by the error


Windows may soon come up with a patch to fix this error permanently. In the meanwhile, the above steps will let you install the Windows 10 apps in your device. Did this fix the 0x803f8001 error for your PC, phone or tablet? Do you have any other solution? Let us know in the comments.

download now

Read More

Thursday, September 22, 2016

How to fix Dns Probe Finished Nxdomain error in Chrome

How to fix Dns Probe Finished Nxdomain error in Chrome


The fix/solution for the DNS_PROBE_FINISHED_NXDOMAIN error is same as the one used to cure the DNS_PROBE_FINISHED_BAD_CONFIG and DNS_SERVER_NOT_RESPONDING errors. These errors can affect any Windows operating system i.e. Windows 7, Windows 8.1 and Windows 10. The most common methods recommended by various bloggers is to flush the DNS. This is very easy. All you have to do is enter a single line command in the command prompt. The second fix is to change the default DNS addresses. This second method has been the most effective for most users. Hence, I am posting below the most effective way to fix DNS_PROBE_FINISHED_NXDOMAIN error in Chrome:

How to fix DBS Probe Finished Nxdomain error in Chrome [Windows]

Method 1: Manually change the DNS address

  1. Press Windows key + R and type ncpa.cpl 
  2. Press Enter
  3. Right click on your network (Local Area Network or Wireless Network Connection) and select Properties.
  4. Under Networking tab, you will see This connection uses the following items: list
    • Click on Internet Protocol Version 4 (TCP/IPv4)
    • Click on Properties. A new box will pop up
    • Under General tab, select “Use the following DNS server addresses:”
      • Set Preferred DNS Server to 208.67.222.222 (or 8.8.8.8)
      • Set Alternate DNS Server to 208.67.220.220 (or 8.8.4.4)
  5. Open Chrome, check to see if the DNS Probe Finished Nxdomain error is fixed or not. If the error is unresolved , change the Alternate DNS Sever to either 8.8.8.8 or 8.8.4.4.
Network adapter properties in Windows 10
Network Properties


If the above solution didnt work try the method 1 and  method 2 on this post: How to fix DNS_PROBE_FINISHED_NO_INTERNET

Do you have any other fix for this error? Let us know in the comment section. 


download now

Read More

How to fix DNS Server Not Responding Error in Chrome browser

How to fix DNS Server Not Responding Error in Chrome browser


The DNS Server Not Responding error is a Windows error that stops your from viewing webpages of certain websites on Chrome browser. You will have to refresh the webpage several times to make it load. This error can occur despite a good internet connection. So the first step in diagnosing this issue is to check your Wi-Fi or mobile data connection for internet access. The DNS Not responding Error occurs when your Windows Phone or Windows PC cannot connection to the Domain Name Server, which translates a website’s address to let you connect to the website. This can be caused by a server problem, in which case you can just wait for it to be resolved, or it can happened due to corrupt network settings. Here are some quick and easy methods to fix DNS Server Not Responding Error in Windows Chrome browser:

How to fix DNS Server Not Responding Error in Windows Phone or PC

Also used to fix DNS_PROBE_FINISHED_NO_INTERNET

The internet is filled with lots of solution and fixes for the DNS Server error, but here I am only posting the ones that have worked for most users.

Method 1: Flushing DNS


  1. Press Windows key + R and type cmd and press Enter
  2. Type ipconfig /flushdns
  3. You will see a message that says Successfully Flushed the DNS Resolver Cache
  4. Check to see if the problem resolved. If it still exists, try the method below.


Method 2: Edit DNS Server address in Network Settings

To manually setup the DNS address, follow these steps:
  1. Press Windows key + R and type ncpa.cpl and press Enter
  2. Right click on your network connection (Local Area Network or Wireless Network Connection) and select Properties.
  3. In the Networking tab, you will see “This connection uses the following items:” list
    • Click on “Internet Protocol Version 4 (TCP/IPv4)”
    • Click on “Properties. A new box will pop up
    • In General tab, select “Use the following DNS server addresses:”
      • Set Preferred DNS Server to 208.67.222.222
      • Set Alternate DNS Server to 208.67.220.220 (or 8.8.8.8 or 8.8.4.4)
  4. Check if the DNS Not responding error is fixed. If it still persists, set the Alternate DNS Sever to either 8.8.8.8 or 8.8.4.4.
Network Properties: General Tab

Editing DNS Server Addresses in TCP/IPv4 

The above two methods have been the most effective for Windows users affected by the DNS Server Not Responding Error. Did you solve this error? Do you have other alternative methods or solutions for this error? Let us know in the comments.


download now

Read More

Wednesday, September 21, 2016

Zombiewood – Zombies in L A! Apk v1 5 3 Mod Free Shopping

Zombiewood – Zombies in L A! Apk v1 5 3 Mod Free Shopping


Zombiewood – Zombies in L.A! Apk v1.5.3 Mod (Free Shopping)

Free Download  Zombiewood – Zombies in L.A! Apk v1.5.3 Mod (Free Shopping):  Sore Bro!!! kali ini saya akan membagikan sesuatu game dengan versi yang baru yang bernama Zombiewood-Zombie in L.A!. Zombiewood-Zombie in L.A! Game ini bercerita tentang keadaan kota los angeles yang diserang oleh gerombolan zombie, jalan-jalan yang tadinya ramai dan kota yang tadinya mewah kini menjadi menyeramkan dan berbahaya. Para zombie ini tidak hanya mengobrak-abrik kota, namun mereka menyabarkan virus zombie kepada masyarakat los angeles. Sehingga, kota tersebut penuh dengan para zombie. Tugas anda disini yaitu untuk membasmi para zombie yang berkeliaran di kota tersebut, jangan sampai anda lengah atau anda akan digigit dan berubah menjadi zombie seperti mereka.

Features:

  • Dash, run and slaughter in fun dual-stick shooter action
  • Shred through wave after wave of crazy zombies
  • Zap, boil & burn zombies with 30 wicked ‘n’ wild weapons
  • Cartoon style inspired by a Hollywood setting
  • Wage combat in 20 different movies and 10 unique game modes
  • Mix and match funny, outlandish outfits
  • Rise to the top of the games leaderboard against your friends
  • Regular content updates with more free movies, guns, gore and non-stop action!.

    Screenshot:

    Zombiewood – Zombies in L.A! Apk v1.5.3 Mod (Free Shopping)
    Zombiewood – Zombies in L.A! Apk v1.5.3 Mod (Free Shopping)

    Whats New:

    • Minor bug fixes.

    Link Download:

    Download Zombiewood – Zombies in L.A! Apk v1.5.3 Mod (Free Shopping)
    Download Zombiewood – Zombies in L.A! v1.5.3 Mod Apk
    Download Zombiewood – Zombies in L.A! v1.5.3 Mod Data

    download now

    Read More

    How to stop building font cache in VLC Player while playing video files

    How to stop building font cache in VLC Player while playing video files


    If you are a movie or anime enthusiast, you’ve probably encountered the message saying “Building font cache” on VLC Player while playing an MKV or MP4 video. Then you see a progress bar that seems to get suck in 0% or 1%. While the pop up says “Please wait while your font cache is rebuilt. This should take less than a minute”, if you have a basic PC or laptop, the rebuilding process can take more than five minutes and in rare cases the VLC player itself will stop responding and you have to force close it. It can be very irritating when you have to unnecessarily wait for VLC to start playing your video files. The good thing is you can easily fix this irritating video playback delay by simple changing a settings option on VLC media Player.

    How to stop building font cache in VLC Player on a Windows PC

    Screenshot of VLC Player "building font cache" dialogue box
    The building font cache dialogue box appears on VLC Player while playing video files with embedded subtitles displayed at the bottom. Here is how you can disable font cache building on VLC Player:

    • Open VLC Player
    • Go to Tools >> Preferences
    • On the bottom left, you will see “Show Settings” >> select “All”
    • Now, go to Video >> Subtitles/OSD
    • On the right, you will see “Text Rendering Module”
    • Select “Dummy font renderer” from the drop down menu

    Screenshot of VLC Player Video settings

    After completing above steps, the “building font cache” dialogue message will stop displaying while playing video files. In case your VLC Player hangs up during the cache building process, you may have to delete the temporary app data. To fix this issue:

    • Press windows key + r (to bring up “run” box)
    • or simply press windows key and type “run” in windows search
    • Type %appdata%
    • Find the VLC folder and delete it

    After deleting the VLC app data folder, VLC will build font cache from scratch and won’t freeze up this time.

    To conclude, always make sure your VLC player is up to date. For this, open VLC Player >> go to “Help” >> Select “Check for Updates”. The latest version of VLC has cleared many bugs and improved video performance for different file formats inclyding .mkv. .mov, .mp4, .dat and .mpeg.


    download now

    Read More

    Free Download Clash Of Clans Mod FHx V8 Private Server In Indonesia Terbaru November 2015

    Free Download Clash Of Clans Mod FHx V8 Private Server In Indonesia Terbaru November 2015


    Free Download Clash Of Clans Mod FHx V8 Private Server In Indonesia Terbaru (November) 2015


    Free Download Clash Of Clans Mod FHx V8 Private Server In Indonesia Terbaru (November) 2015 : Selamat malam dan salam sejahtera untuk kita semua, dimalam yang indah ini saya admin akan share kembali seputar Android Apps, yang memang hingga kini selalu mengalami update terbaru, nah pada kesempatan kali ini saya akan share tentang Game COC Mod Terbaru 2015 versi Private Server In Indonesia, Seperti apa Game ini? still in MASARIETECH.BLOGSPOT.COM
    Jika biasanya kita kalo lagi main COC selalu sibuk untuk mengumpulkan loot karena server dari supercell, nah kali ini berhubung sudah ada versi MOD Server Indonesia, temen-temen tidak perlu lagi melakukan itu.
    Pasalnya COC ini, memang sudah di MOD sedemikian rupa dengan server sendiri, nah selain itu ada beberapa keuntungan jika temen-temen menggunakan COC Mod FHx V8 Private Server Indonesia, diantaranya:
    Adanya fitur unlimited seperti
    • Gold 800.000.000 
    • Elixir 800.000.000
    • Gems 800.000.000
    Dan keuntungan yang lain, temen-temen tidak perlu menggunakan ponsel Android yang sudah di root, karena game ini sudah support dengan ponsel non root
    Untuk lebih jelasnya, temen-temen bisa cek screenshot dibawah ini.


    Adapaun Fitur dari Clash Of Clans Mod FHx V8 Private Server Indonesia:
    • P.E.K.K.A King
    • GOBLIN King
    • GIANT King
    • Wall Breaker King
    • Wizards King
    • Super Wizards King
    • Golem King
    • Hog King
    • Lava King
    • Ballon King
    • Minion King
    • Dragon Queen
    • Valkyrie Queen
    • Witch Queen
    • Super Archer Queen
    • New Dragon Tower, Witch Tower, Archer Tower (Special Edition), Barbarian Tower, Damager Healer Tower 
    • 500/slot army Camp
    • Unlock All Traps, All Decos
    • Unlock Gems Package
    • Availabel AIR SWEEPER (HOT)
    • Etc
    Nah pasti temen-temen ada yang bertanya, gimana installnya kalo sudah instal COC versi Playstore?
    Tenang.. karena COC ini versi MOD, maka COC ini bisa diinstall langsung tanpa harus uninstall COC versi Playstore, yang artinya gak bakal ganggu COC pertama, jadi bisa disandingkan.
    Dan Juga perlu di ingat..Sedikti Tips dari saya bahwa ketika temen-temen mau main COC Mod ini, mohon untuk download dan install lebih dari satu server, karena keduanya menggunakan server yang berbeda, jadi jika server B gak bisa, maka bisa pake yang A (yang versi online)

    System Requirements
    • Size : 46 MB
    • Android Version : 4.0 Up
    LINK DOWNLOAD
    • Server 1 Clash Of Clans Mod FHx v7 Server X Online
    • Server 2 Clash Of Clans Mod FHx v7 Server A Ofline
    • Server 3 Clash Of Clans Mod FHx v7 Server B Online
    • Server 1 Clash Of Clans Mod FHx v8 Server C Online
    • Server 2 Clash Of Clans Mod FHx v8 Simulasi Ofline

    Source: Update4apk.com
    Editor : Yanuarie Firmansyah 

    Demikian informasi terupdate tentang Free Download Clash Of Clans Mod FHx V8 Private Server In Indonesia Terbaru (November) 2015
    Terimakaish telah berkunjung di MASARIETECH.BLOGSPOT.COM semoga bermanfaat dan selamat berkunjung kembali.

    download now

    Read More

    Tuesday, September 20, 2016

    How to beat the Pursuer quickly with Ballista in Dark Souls 2

    How to beat the Pursuer quickly with Ballista in Dark Souls 2


    If youre having a hard time defeating the Pursuer boss using your usual lock target, Dodge and
    Attack technique, you can check out the video below. I actually managed to defeat him in a few seconds by using the giant crossbow Ballista. You can just let him come to you and perform an attack so that he is in line with the Ballista. After that simply dodge the attack and run towards the Ballista and fire it. Don’t look back or anything just run straight and grab the Ballista. If you hesitate, the Pursuer will just wreck the Ballista and it will be very difficult to defeat him after that.

    If you manage to hit him with the Ballista arrow, he will incur massive damage. He should be down 90% of his health and now you can kill him with one hit. The usual Parry, Dodge, Circle Strafing strategy can also be used to defeat him, but that will take a lot longer than using the Ballista. Watch the video below to see how to you the Ballista strategy but you can use the Ballista any way you like, just try to hit him once. The video also shows where you will find the Drangleic Armor, Drangleic Shield and Drangleic Sword.


    How to beat the Pursuer quickly with the Ballista in few seconds


    download now

    Read More

    Top 10 Most Popular Software in February 2016

    Top 10 Most Popular Software in February 2016


    1. Avast Free Antivirus 11.1.2245 - Download
    AVAST Software - 154 MB - Freeware
    One of the most popular anti-virus program for Windows


    2. Viber for Windows 5.4.0 - Download
    Viber Media Inc - 97 MB - Freeware
    Make free calls to other Viber users, on any device and network


    3. Adobe Acrobat Reader DC 2015.009.20069 - Download
    Adobe Systems Inc - 78 MB - Freeware
    The all-new Reader. For your all-important documents and files


    4. Avira Free Antivirus 15.0.15.125 - Download
    Avira Operations GmbH - 206 MB - Freeware
    Free Antivirus Trusted by Millions Of Users Around the World


    5. Skype 7.17.0.106 - Download
    Microsoft Corporation - 45 MB - Freeware
    Talk with friends and family for free over the World


    6. VLC Media Player 2.2.1 (32-bit) - Download
    VideoLAN team - 28 MB - Open Source
    One of the best multi-format media player for Windows


    7. Java JRE 8 Update 66 (32-bit) - Download
    Oracle - 48 MB - Freeware
    Java software allows you to run applications


    8. ManyCam 5.1.0 - Download
    ManyCam LLC - 62 MB - Freeware
    The best free live studio & webcam effects software for Windows


    9. 4K Video Downloader 3.8.0.1830 - Download
    OpenMedia LLC. - 27 MB - Freeware
    Allows to download video, audio and subtitles from Internet in high-quality


    10. iTunes 12.3.2 (32-bit) - Download
    Apple Inc - 112 MB - Freeware
    Best way to organize and enjoy the music, movies, and TV shows

    download now

    Read More