Showing posts with label make. Show all posts

Thursday, September 29, 2016

How To make A PiZZa !!!

How To make A PiZZa !!!


How To MAke A PiZZa!!!


Very Easy And Simple Isnt it???

 see video Here!!!

http://sniidevices.scrippsnetworks.com/0154/0154938_3.mp4

download now

Read More

Wednesday, September 28, 2016

8 Tips to Make Windows 10 battery last longer

8 Tips to Make Windows 10 battery last longer


Not liike the previous versions of Windows, Windows 10 was made to run optimally on mobile devices such as laptops, tablets, and hybrid.

No wonder if eventually there are a variety of features that you can use to make batteries laptop / tablet Windows 10 become longer. But unfortunately not all Windows 10 users take advantage of this feature.

For those of you who want to batteries laptop / tablet Windows 10 yours is longer, following these 7 tips you can practice:

1. Set Battery Saver
Battery Saver is a feature in Windows 10 that you can use to save battery laptop / tablet.

This feature will automatically manage power usage in Windows 10 so as to be more efficient.

Battery Saver will automatically turn on when the battery is below the percentage that you specify, and automatically turns off when the battery is more than that.

You can set what percentage of the minimum battery before the battery saver turns on automatically. The default is 20%, but you can increase this percentage if you often work in mobile and need to conserve battery power longer.

To change it you can open the Settings> System> Battery Saver> Battery saver settings> then scroll to the percentage that you want.


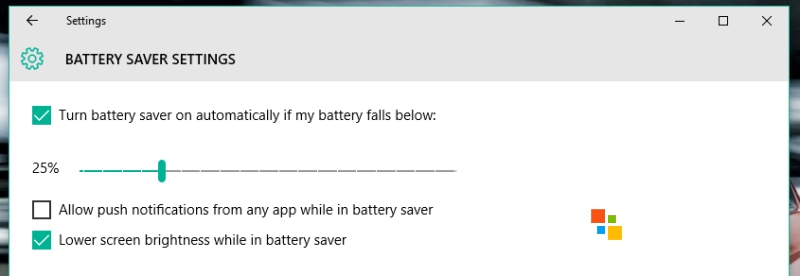
Make sure the checkbox Lower screen brightness while in battery saver participate checked.


2. Reduce Background Apps

Still in Battery Saver, click the Battery Use> Change background app settings> then turn off background apps that you never use.

Here I turn off the Groove Music, Get Office, Weather, and Xbox because they have never used it.


The more background app that you switch it off, the more battery saving laptop / tablet Windows 10 you.

In addition through the Battery Saver, these settings you can also access through Settings> Privacy> Background Apps
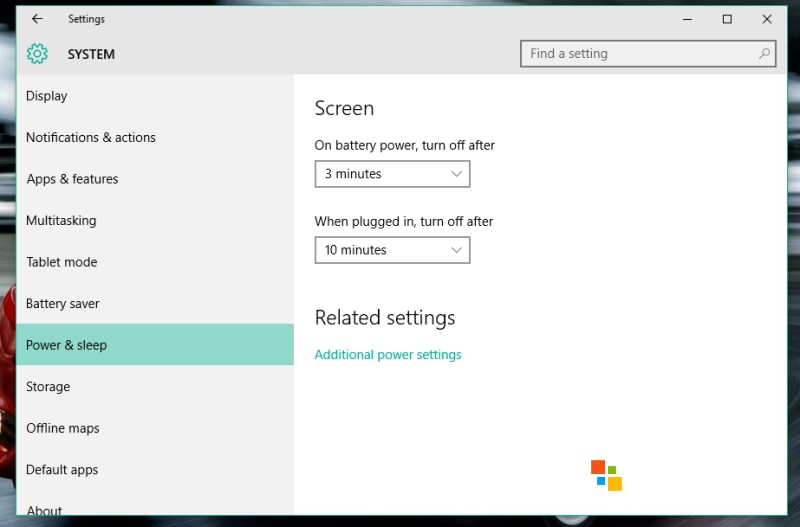


3. Set Power & Sleep

You can set how long the screen turns off automatically when the laptop / tablet in idle condition using the battery via the Settings> System> Power & sleep

It is important that the battery is not wasted to turn on the screen when youre not using.

Here I set the display will turn off automatically if within 3 minutes laptop I did not use.


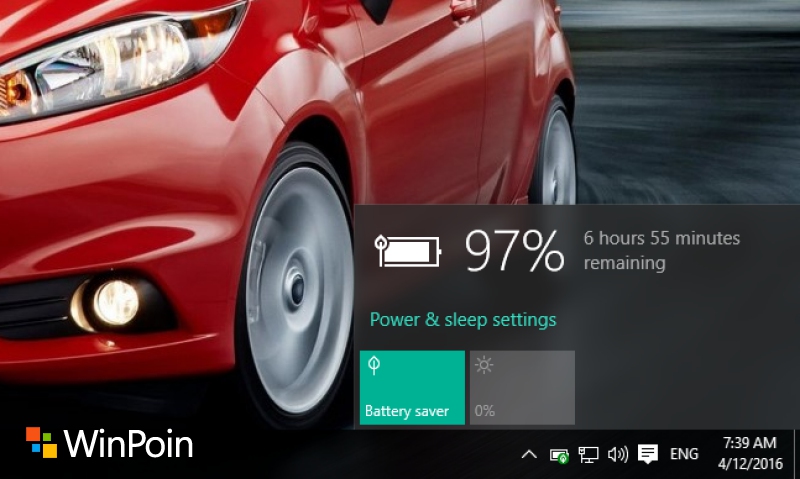
4. Turn on Battery Saver & Change Power Plan If ..

When you:


  • Being outdoors
  • Away from the charger
  • Plans to use the laptop for long periods without charging
  • and other similar conditions

You can turn on Battery Saver although the percentage of battery power is still high.

I click the battery icon in the system tray, and switch Battery Saver manually with a click of a button.


You can also change the power plan to Power Saver, by right-clicking the battery icon> Power Options> Change to Power Saver


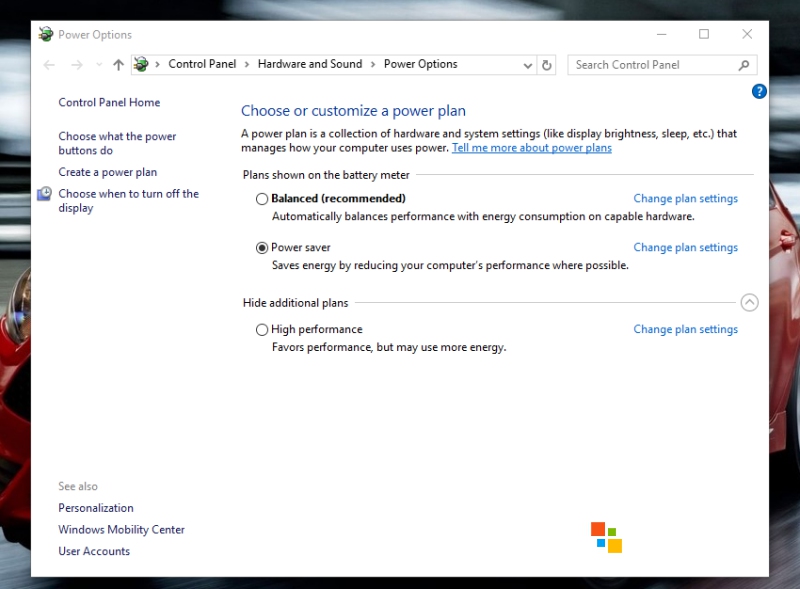
This is done so that you can use a laptop without charging in time as long as possible.

But you need to know that both of these will be affected to a decline in the performance of the laptop / tablet Windows 10, but it will maximize the durability of the battery during use.


5. Decrease Brightness

Its no secret that the screen is one component of a laptop / tablet which consumes a lot of battery power. Therefore if you are in need of maximum battery durability, lower the brightness on your screen.

But of course make sure brightness remains at a comfortable level for your eyes when using it.


6. Set Power Plan (Advanced)

Windows comes with several default power plan that you can modify, even you can create new ones from scratch.

Lets say you create a new power plan according to the conditions, for example Out of Home, At Work, etc; then customize the configuration according to your needs.

You can also modify an existing power plan.

To do this simply right click the battery icon in the system tray> Power Options> Change plan settings on the power plan you want to modify> Change advanced power settings

Well there you can set it manually, when Windows will shut down the hard disk when idle, paused jamming desktop background, saving power WiFi, etc.


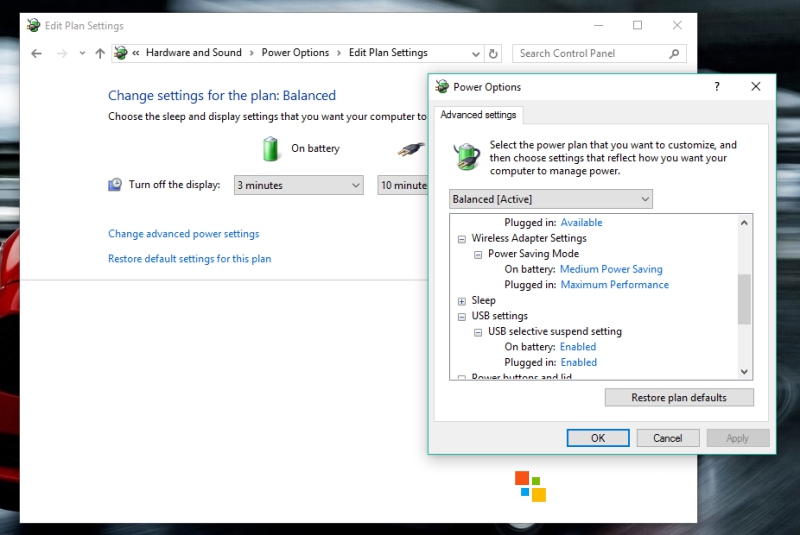
In many ways it is actually an advanced modification is not so necessary, but for those that want to, why not?


7. Reduce Startup Program

Startup program runs in the background, resource consuming, and of course participate consumes battery power.

Some software automatically inserts itself as a Startup Program, although it is not required.

Therefore, if it is a program you do not need to run automatically in the background, disable any of the Startup Program.

The trick is to right-click the Start Menu> Task Manager> Startup> and disable programs you need.


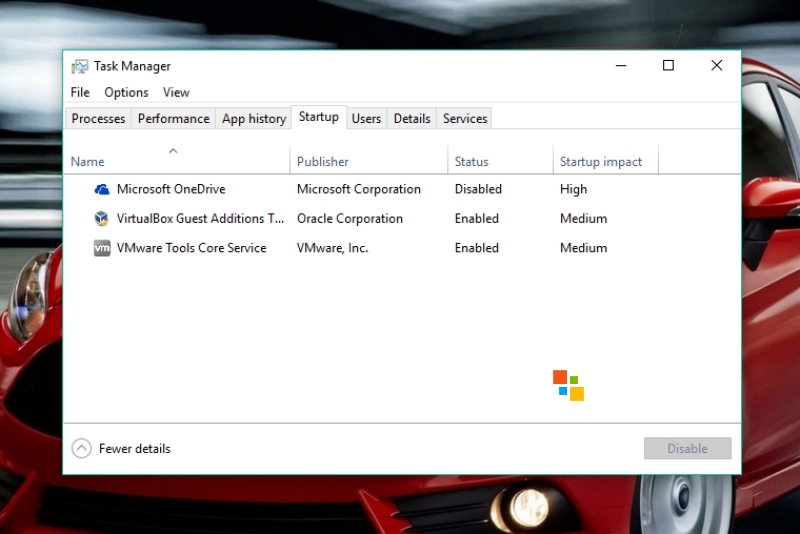
The more minimal running Startup Program, supported by the lack Background Apps above, the battery laptop / tablet Windows 10 you will be more durable.


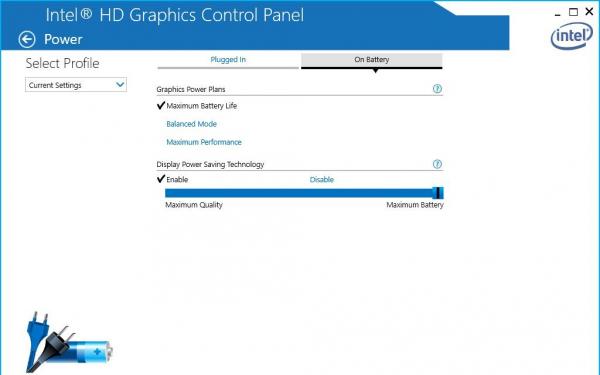
8. For those who use Intel may set power settings so Maximum Battery Life can sometimes add up to 1-2 hours longer battery ??


Thats 8 tips to make windows 10 battery last longer.

If you have other interesting tips, please share via the comments field below.

download now

Read More

Friday, September 16, 2016

How To Make Chakkar Pongal

How To Make Chakkar Pongal


Ingredients
  1. Long grain rice – 2 cup
  2. Split green gram (without skin) – 1  cup
  3. Sugar – 2 ½ cup
  4. Cardamoms - 6
  5. Raisins and cashews – 4 tbsp
  6. Fresh coconut cut, small pieces or shredded coconut – ½ cup
  7. Ghee – ¾ cup
  8. Milk – 2 cup
  9. Water - 2 ½ cup
 Method :
  • Dry roast the split green gram on medium heat for 5 to 10 minutes till it becomes light pink and a nice aroma arises.
  • Cook the rice and split green gram in 2 cups milk with 2 ½ cups water in rice cooker or on stove in a pan.
  • In the meantime, while it is cooking melt the 3 tablespoons of ghee and fry the raisins and cashews on medium heat till cashews turn light golden, drain them and fry coconut pieces or shredded coconut in the same ghee till golden. Set all these seasoning aside.
  • Crush the cardamom to powder.
  • When the rice gets cooked, remove the rice and place it in a pan large enough to hold it and the sugar. Add sugar, cook on medium heat till all the sugar is absorbed. Stir it often to avoid burning.
  • After the sugar has been absorbed add ½ cup ghee and turn off the stove.
  •  Add the fried coconut, cashews, raisins and cardamom powder. Stir it and let it stay on the stove for 2 or 3 minutes.
  • Afterwards remove from heat.
  • Serve warm.

download now

Read More

Friday, August 26, 2016

How To Make Bitter Gourd Pickle

How To Make Bitter Gourd Pickle


Ingredients
  1. Bitter gourd (small variety) – ½ kg
  2. Aniseed – 2 tbsp
  3. Red chili powder – 2 tbsp
  4. Asafoetida – 1 tbsp
  5. Salt to taste
  6. Dried mango powder (amchoor) –  2 tbsp
  7. Turmeric powder – 1 tbsp
  8. Citric acid – ¼ tsp
  9. Garam masala – ¼ tsp
  10. Coarsely crushed coriander seeds – 1 tbsp
  11. Coarsely crushed mustard seeds –  2 tbsp
  12. Oil – 250 gms

Method
  • Peel and apply turmeric and salt to bitter gourds. Keep aside for 1/2 hour.
  • Put them in boiling water with the citric acid. Boil for 5-7 minutes.
  • Remove from water and wipe dry.
  • Heat half the oil, add asafoetida, sauf, coriander seeds. Remove from fire.
  • Add all the masalas and mix well.
  • Cool and fill in the gourds. Tie them up securely with string.
  • Arrange them in a glass or pickle jar. Heat remaining oil a little.
  • Add a few pinches citric acid and 1/3 tsp salt. Pour over the gourds.
  • Allow to tenderize for 3-4 days more. Remove string before serving.

download now

Read More

Tuesday, August 16, 2016

How to make a bootable Kali Linux 2 0 USB

How to make a bootable Kali Linux 2 0 USB


How to make a bootable Kali Linux 2.0 USB with persistence that save files

Do you want to change the settings, update, and save some files in Kali Linux Live USB without losing your work.

How to make a bootable Kali Linux 2.0 USB with persistence. Persistence means that all the data changes that take place while you are using the system, they will be saved on the usb / pendrive that you Linux is in.

bootable Kali Linux

Reasons for using Live USB with Persistence are:
  • · You use all of your system resources eg. CPU, RAM, GPU, etc
  • · You take no space of your Hard Drive for it.
  • · You can take your OS to any PC you use.
bootable Kali Linux

Requirements:

1. Universal USB Installer : www.pendrivelinux.com/universal-usb-inst­aller-easy-as-1-2-3/


or Rufus Faster bootable maker : https://rufus.akeo.ie/

2. Kali Linux Image : https://www.kali.org/downloads/

3. MiniTool Partition Wizard : www.partitionwizard.com  

OR http://download.cnet.com/MiniTool-Partition-Wizard-Free-Edition/3000-2094_4-10962200.html


TUTORIAL:
1. DOWNLOAD KALI LINUX ISO AND MAKE A BOOTABLE LIVE KALI


bootable Kali Linux

 3. CREATE 2 PARTITION WITH MINI TOOL

1. Select your USB drive with Kali Linux  right click  and choose  Move/Resize
  I resize mind 3.2 gig

bootable Kali Linux

bootable Kali Linux
 
2. Click the Unallocated rigth click to create new partition.


bootable Kali Linux


3. Name the partition label  "persistence" , create as "primary" , file system "Ext4" , cluster size "default" .

bootable Kali Linux


4. Click "Apply"  check .. and then click Yes.

bootable Kali Linux


Wait 10 minutes or more...

bootable Kali Linux


4. BOOT FROM YOUR NEW KALI LINUX LIVE USB PERSISTENCE
OPEN THE TERMINAL (CMD LIKE)

bootable Kali Linux


Commands Used In Kali :


UUI is the drive name change with your own drive name label

1. fdisk -l : To List Your Drives

2. mkdir -p /mnt/UUI : Make a directory on the filesystem to mount your USB

3. mount /dev/sdb2 /mnt/UUI : Mount the partition on the directory you made

4. echo "/ union"> /mnt/UUI/persistence.conf : Adds a configuration file to enable persistence.

5. umount /dev/sdb2 && reboot : Unmount the partition and reboot.


OK DONE!!..

When Kali as password type : toor
user name is : root

download now

Read More

Saturday, August 13, 2016

Make your Usb into bootable Drive to install windows

Make your Usb into bootable Drive to install windows


WiNToBootic: Drag & Drop ISO Images To Create Bootable USB Drives For Windows Installation

Before the use of USB flash drives to install Windows became common, we could only install Windows on our computers using CDs. At that time, installing an operating system using a USB flash drive sounded like a thing of the future, but today, it is as common as using a CD. Newer versions of Microsoft Windows, like Windows 7, can be installed in two ways: directly from Windows XP and Windows Vista, and by using a bootable USB/CD. If your PC doesn’t have any operating system installed, then you may need a bootable USB drive to boot the system into Windows installation setup. Today, we have an application for you called WiNToBootic, which allows you to make a bootable NTFS USB drive for installing Windows. The application focuses on speed and convenience, allowing you to write ISO images via drag and drop. Furthermore, unlike other bootable USB creators, WiNToBootic provides a Quick Format option, which saves you the time you would’ve spent performing the operation yourself. More on WiNToBootic after the jump.
The software has a lot features which are not included in other bootable USB making programs, such as NTFS Support, Windows 7 Bootloader, ISO 9660 (Joilet), ISO 13346 (UDF), ISO: Windows 7/ 8/ 2008/ Vista/ PE2 and PE3. The application presents a simple, straightforward usage. When you plugin the USB, the program automatically recognizes it and makes it available for use. In order to make a bootable USB flash drive for Windows,  plug-in a USB and enable the Quick Format mode if you want to quickly format the drive. Now, drag the ISO over the main interface and click Do It!.
1

The application provides you with information regarding each task that is being performed at the back end. The information will let you know on every step when the flash drive is formatted, the bootloader is flashed, and the ISO is extracted. When all the processes are finished, just remove the drive to use it for booting any system into Windows installation setup.
3
What is different in this application is the fact that all the information, about what is happening behind the scenes, is displayed to the users and you can time your other activities accordingly. For instance, if you see that a particular process is taking a lot of time, you can finish another important task in the meantime, instead of waiting uselessly for the bootable USB drive to e created. WiNToBootic works on both 32-bit and 64-bit versions of Windows XP, Windows Vista, Windows 7 and Windows 8.
Download WiNToBootic
Posted By Sachin Rastogi

download now

Read More