Showing posts with label wi. Show all posts

Wednesday, September 7, 2016

Facebook OpenCellular for 4G LTE and Wi Fi Access Unveiled

Facebook OpenCellular for 4G LTE and Wi Fi Access Unveiled


OpenCellular can be attached to a lamp pole or tree even by a single person. The design is simple enough but can withstand extreme temperatures and typhoons.

Facebook Unveiled OpenCellular that Provides 4G LTE and Wi-Fi Access in Remote Areas


Facebook OpenCellular

To work, it needs to be connected to a power supply and a backhaul network access. The latter means the device itself should be connected to the internet and a cellular network in order to provide connectivity to its users. This can be done through a single wired connection to the nearest area with internet and cellular coverage or wirelessly through drones and satellites.

Facebook has been pouring efforts to expand the reach of the internet to remote areas of the world. Their newest project is OpenCellular.

It’s a device roughly the size of a shoe box that can provide 2G, 3G, 4G LTE and Wi-Fi networks in a small community. It’s essentially a mini cell site!

download now
Read More

Sunday, August 28, 2016

How to fix stuck Obtaining IP Address in Wi Fi on Android devices

How to fix stuck Obtaining IP Address in Wi Fi on Android devices


While most Android errors are
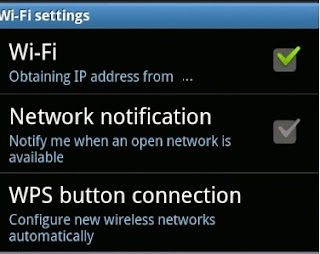
Google Play Related, this post addresses"Obtaining IP address from ..."  network connection issue that prevents users from connecting to WiFi networks. Many Android devices are unable to connect to the internet because it gets stuck in obtaining IP address loop while trying to connect to home or office WiFi network.

Most users try resetting the router and disconnecting and reconnecting to WiFi but these fixes seldom work, and some even send their Android device for repair, which end up costing them money. Actually, you can easily fix the obtaining IP address Wi-Fi error yourself by following the steps below. Please note that this fix is intended for your home network and not for public access points where you have to access to the router configuration.


How to Fix Obtaining IP Address in Wi-Fi settings for Android devices

  • First turn on Wi-Fi on your Android device
  • Go to system Settings >> Network >> Tap on WiFi 
  • Now you will see various Wi-Fi networks 
  •  Long Press on your Wi-Fi connection 
    • Now you will get two options in the pop up- “Forget network” and “Modify network”.
    • Choose “Modify network”.
    • Enable- “Show advanced options” .
    • Change IP Settings (which is DHCP by default),to “Static”. 
    • Now you should see a bunch of advanced options.
    • Simply assign a new IP address. For example if it was 192.168.1.3 you can change it to 195.168.1.253. Now “Save”
The above solution is for devices running Android Jelly Bean 4.2.x, 4.3, Android 4.4 KitKat and Android 5 Lollipop. It may also work for Android 6.0 Marshmallow devices. Smartphones with the latest firmware rarely face such issue where users cant connect to  Wi-Fi due to obtaining IP address problem. For Older Android OS, the menu navigation is different but the process is basically the same. Just go to Wi-Fi settings, press Menu and choose Advance. Then enable “Static IP” and assign new IP address. Many custom ROMs like Cyanogenmod, Paranoid Android, SlimRom etc also get the obtaining IP address error.

Common devices experiencing this stuck on “Obtaining IP address” message include Samsung Galaxy S3, Galaxy S4, Galaxy S5, Galaxy S duos, Galaxy Note 3, Note 4 and Galaxy Tab. Sony sony xperia Z, Xperia Z2, Sony Xperia E, Huawei X5, Huawei Ascend C300, HTC Desire, HTC Wildfire, HTC One X, HTC One, HTC One S , Nexus 5 etc

download now

Read More

Monday, August 15, 2016

Cara Mengetahui Password Wi fi Orang Lain

Cara Mengetahui Password Wi fi Orang Lain


Gantengers | Cara Mengetahui Password Wi-fi Orang Lain sangat mudah sekali karena kita hanya akan memanfaatkan tools yang sudah dibuat oleh programmer handal dan karena saya yakin anda sedang menggunakan modem untuk mencari user dan password wi-fi lewat google haha. Pengalaman saya sendiri saya pernah berpergian ke sesuatu tempat dan di suatu toko mengaktifkan wi-fi namun ber password sungguh disayangkan layanan yang seharusnya gratis untuk meramaikan toko tapi didapatkan dengan cara berbayar. Dan setelah saya mendapat informasi dari beberapa rekan saya dan menganjurkan untuk menggunakan tools untuk mengetahui user dan password wi-fi. Saya sendiri kurang yakin tapi apa salahnya mencoba dan saya berhasil menemukan salah satu user password dari wi-fi itu sendiri dan begitulah kurang lebihnya curhatan gue haha oke mari lanjut ke tutorial.

Cara Hack TP-Link Admin Password


Cara Hack Dan Mengetahui Password Wifi Orang Lain
Kali ini kita akan membobol sistem router modem wi-fi yang terkoneksi yaitu TP-Link Speedy untuk mendapatkan akses wi-fi secara gratis disana anda bisa membuat atau menambahkan akun wi-fi bahkan anda juga bisa mengatur cepat atau lambatnya koneksi wifi saya sendiri pernah masuk ke router tapi hanya untuk mengatasi koneksi yang dilimit oleh sistem administrator tidak lebih. Nah ingin mencoba ? Ikuti tips berikut 
  1. Cara Hack TP-Link Admin Password
  2. Pertama pastikan dulu anda telah terkoneksi dengan wi-fi dan belum login/sudah login
  3. Lalu Buka Browser anda dan silahkan mengetikan 192.168.1.1 lalu enter
  4. Biasanya akan meminta Password silahkan isi dengan pilih salah satu
    User          = admin
    password  = admin 
    user           = user
    password  = admin
    "silahkan bolak balik password diatas atau untuk password dikosongkan.
  5. Lalu klik Login
  6. Kalau sudah masuk ke TP-Link lihat bagian Interface Setup Wireless distu sudah terlihat password nya.
Cara Hack Password User Wi-fi With WireShark

Cara Hack Dan Mengetahui Password Wifi Orang Lain
Hack Wi-fi Password dengan WireShark sudah banyak kabar gembira mengenai tools ini dan ini juga tools yang direkomendasikan untuk anda karena penggunaan nya cukup mudah dan dilengkapi fitur yang cukup canggih untuk mendapatkan sekaligus menerjemahkan file password yang ter-enkripsi. silahkan ikuti tutorial berikut ini

  1. Silahkan anda download dulu tools WireShark 
  2. Setelah di download tekan tombol Ctrl+K lalu klik capture lalu option dan jangan lupa pastikan interfacenya ialah Ethernet Card anda menuju kejaringan kalau belum silahkan ganti dulu dan pastikan juga dalam mode on
  3. Klik start dan tunggu sebentar sekita 1 menit.. lalu klik Stop 
  4. Lalu anda bisa melihat semua jenis paket yang keluar masuk di dalam jaringan
  5. Setelah itu silahkan klik kanan pada data yang ingin anda lihat terus Klik follow TCP Stream dan saatnya kita melihat-lihat data yang dipublish oleh administrator wi-fitersebut 
Cara Hack Password User Wifi With NirSoft

Cara Hack Dan Mengetahui Password Wifi Orang Lain
Cara Ketiga sekaligus cara terakhir ini adalah tips dan trik yang sangat mutakhir untuk menemukan password wi-fi karena penggunaan nya cukup mudah dan software ini tidak perlu diinstal jadi bisa anda taruh di flasdisk atau di komputer anda simple bukan dan software ini bernama Wireless Key View buatan NirSoft dan sudah banyak digunakan oleh orang-orang dijagat internet ini untuk tutorial silahkan ikuti tips berikut ini
  1. Silahkan anda download softwarenya Wireless Key View
  2. Pilih sesuai kategori komputer anda download nya dibagian paling bawah
  3. Kalau sudah buka software nya maka akan terlihat langsung password wi-finya
  4. lihat gambar dibawah itu adalah user dan password wi-fi dari handphone saya joz kagak ? wkwk
    Cara Hack Dan Mengetahui Password Wifi Orang Lain
Berikut adalah tutorial singkat mengenai Cara Hack Dan Mengetahui Password Wifi Orang Lain berhubungan dengan hack wi-fi ini sudah banyak yang ingin login dan mendapatkan user secara free berikut adalah tips dan triknya dan jika masih bingung dengan tutorial ditas silahkan anda bertanya di kotak komentar dibawah terima aksih atas perhatiannya .

download now

Read More

Friday, August 5, 2016

How to turn your laptop into a Wi Fi hotspot or temporary router – Windows 10

How to turn your laptop into a Wi Fi hotspot or temporary router – Windows 10


Here is the story of why I wanted to turn my laptop into a Wi-Fi hotspot or a temporary router: Last week we had a big thunderstorm and a lightning seems to have struck our cable internet. This fried the WAN port of my router and the DSL port was no longer blinking green to show a working internet connection. All of the LAN ports were working fine but I didn’t have enough Ethernet cable lying around to connect all of my home computers. So I decided to do learn how to broadcast Wi-Fi from my laptop to other devices or how to setup my laptop to work as a router. You have probably heard of wi-fi hotspots on smartphones and the same features is available on laptops with Wi-Fi or WLAN cards. While using a laptop as Wireless Access Point is not as effective as a router, it will come handy on situations where you only have an Ethernet cable and you want to share Wi-Fi to other devices on the floor. Here are steps to enable Wi-Fi hotspot on Windows Laptops or desktops connected to a DSL broadband connection:


Note: I am assuming you have a normal broadband internet cable connection. Connect the Internet cable (with RJ-45 connector) to your Laptop or Desktop PC’s Ethernet port. Now you should see green or yellow light blinking on the Ethernet port indicating successful connection

Before you setup the Wi-Fi hotspot you need to setup your broadband internet connection: Read: How to setup Broadband cable Internet connection on Windows PC


Now follow these steps to setup your laptop’s wi-fi hotspot


  1. Press windows key + X >> Select “Command Prompt (Admin)”
    • Alternatively, press Windows and type “cmd” >> Right Click on “Command Prompt” and select “Run as administrator”
  2. Now in the Command Prompt, type: netsh wlan set hostednetwork mode=allow ssid=networkname key=password
    • (Replace “networkname” with any name and “password” with a password of your choice for your laptop Wi-Fi hotspot)
  3. Now type: netsh wlan start hostednetwork
  4. Now your hosted network will start but you will have to tweak some settings before accessing the internet
  5. Press Windows key and type “network connections” >> select “view network connections”
  6. Right click on the your active broadband connection and click “properties”
  7. Go to “Sharing” tab and click the check box to “Allow other network users to connect through this computer’s internet connection.”
  8. From the drop down select the newly created hosted connection (it could be named something like this- “Local Area Connection *12) >> Click Ok


Now you can connect other devices such as smartphones, tablets and laptops to the newly setup Wi-Fi hotspot using the password you assigned on step two above. If your Wi-Fi hotspot laptop goes to sleep, you will have to run command prompt as admin and again type: netsh wlan start hostednetwork

If the broadband connection on your Wi-Fi hotspot laptop is abruptly disconnected and reconnected, your Wi-Fi hotspot will stop working. To make it work again, turn off the Wi-Fi on your laptop (the one setup as a hotspot). Then turn it back on. Open command prompt as admin and type: netsh wlan start hostednetwork

Other important commands for Windows laptop hosted network are listed below:

To temporarily stop the Wi-Fi hotspot: netsh wlan stop hostednetwork

To again start Wi-Fi hotspot on your laptop: netsh wlan start hostednetwork

To allow or disallow hosted network:
netsh wlan set hostednetwork mode=allow
netsh wlan set hostednetwork mode= disallow

If you want to change your Wi-Fi hotspot network name (SSID) and password :
netsh wlan set hostednetwork ssid= newSSID
netsh wlan set hostednetwork key=newpassword


How to delete newly created Wi-Fi hotspot or wireless access point on Windows laptop

You can also permanently delete the newly created hosted network by following the steps below. Be very careful not to delete anything else than what has been instructed below

  1. Press Windows >> Type “regedit” >> Right click on it and select “run as administrator”
  2. Navigate to the following path in the Registry: HKEY_LOCAL_MACHINESystemCurrentControlSetServicesWlansvcParametersHostedNetworkSettings
  3. On the right, Right-click on HostedNetworkSettings key >> Click Delete
  4. Restart your laptop


After deleting the network from registry open Command Prompt as admin type: netsh wlan show hostednetwork. It will show you that hosted network is not configured. The last thing you have to do is go to “Network and Sharing” and set your broadband connection to its default settings. Here are the steps:

  1. Press Windows Key and type “view network connections” and click it
  2. Right click on your active broadband connection and select Propertites
  3. Go to sharing tab >> unselect “Allow other network users to connect throught this computer’s internet connection”
  4. Select OK


That’s it. Now the hosted network has been removed from your laptop’s network settings.

download now

Read More