Showing posts with label turn. Show all posts

Monday, September 5, 2016

How to turn off notifications from particular apps on Android

How to turn off notifications from particular apps on Android


The instructions on this tutorial is for devices running Android 4.4 KitKat, Android 5.0 Lollipop, Android 6 Marshmallow and newer operating systems.  Are you bothered by constant notifications from selected Android games like Asphalt 8, Champions, Clash of Clans and notifications from apps like Twitter, Flipboard, Viber, Whatsapp, Facebook and so on? Android has a built-in features to disable or turn off app notifications. You can disable notifications from any particular Android application or game. The notification will remain disable even after you restart or turn off your phone. You will have to enable it from the settings if you want to start seeing the notifications again.


Here are the steps to disable app notifications on Android phones and tablets:
  1. Go to Settings >> Apps 
    Turning off or blocking notifications from Asphalt - Android
    Blocking notifications from Asphalt 8 - Android 6 Marshmallow
    • Settings >> General >> Apps (on LG devices)
  2. Swipe left to get to"All" apps list (on some devices youll get directly to apps list)
  3. Scroll down and select "Viber" or any other app/game whose notifications you want to stop
  4. On Android Kitkat, Tap on "show notifications" and select "OK" (show notification is right below "Force Stop" option)
  5. On Android Marshmallow,  Tap on "Notifications"  >> Turn on "Block" notifications 

Now notification wills top showing up on your lockscreen and notification bar on the top of your Android display. You will also stop getting sound alerts after blocking notifications for the selected apps.


download now

Read More

Wednesday, August 24, 2016

How to turn off auto sync in iTunes

How to turn off auto sync in iTunes


You might have set your iTunes to automatically sync to your iPhone, iPad and iPod touch. When that option is enabled, every time you plug your iDevice into the computer your app data starts syncing. Here is how you can stop or turn off auto sync in iTunes:
  1. Open iTunes on your PC or Mac
  2. From the top menu select iTunes >> Preferences (For Windows, Choose Edit >> Preferences)
  3. Go to "Devices" tab
  4. Check the box for "Prevent iPods, iPhones, and iPads from syncing automatically".

Thats it. Now your iPhone or iPad wont sync automatically to iTunes.


download now

Read More

Sunday, August 14, 2016

How to turn off dialpad touch sound on LG G5 G4

How to turn off dialpad touch sound on LG G5 G4


Out of the box, your LG smartphones has the screen touch sounds option enabled by default. While I personally find the lockscreen sound useful, I dont like my phone to make sounds everytime I touch an icon and I specially dont like the dialpad touch sounds because it doesnt allow me to call someone discreetly. The loud dialpad sounds can be very annoying not only to you but to those around you. Luckily, you can easily mute or turn off dialpad touch sounds on your LG device via Sound & notification settings. Additionally,  if you dont like the vibrations or haptic feedback while typing on the onscreen keyboard, you can also turn it from the "sound and notifications" settings.


Steps to turn off touch sound on dialer of LG G4 or G5 (and other LG devices)

Turning off dialpad touch sounds in LGs "sound effects" settings

  • Go to Settings >>  Sounds & Notification
  • Scroll down and tap on "More"
  • Here you can uncheck "Vibrate on tap" to disable screen tap vibrations or feedback
  • Now Tap on "Sound effects"
  • Uncheck " Dialpad touch sounds" and also "Touch Sound"

There you go, now you wont hear any sounds while dialing a number on your LG phone. 


download now

Read More

Friday, August 5, 2016

How to turn your laptop into a Wi Fi hotspot or temporary router – Windows 10

How to turn your laptop into a Wi Fi hotspot or temporary router – Windows 10


Here is the story of why I wanted to turn my laptop into a Wi-Fi hotspot or a temporary router: Last week we had a big thunderstorm and a lightning seems to have struck our cable internet. This fried the WAN port of my router and the DSL port was no longer blinking green to show a working internet connection. All of the LAN ports were working fine but I didn’t have enough Ethernet cable lying around to connect all of my home computers. So I decided to do learn how to broadcast Wi-Fi from my laptop to other devices or how to setup my laptop to work as a router. You have probably heard of wi-fi hotspots on smartphones and the same features is available on laptops with Wi-Fi or WLAN cards. While using a laptop as Wireless Access Point is not as effective as a router, it will come handy on situations where you only have an Ethernet cable and you want to share Wi-Fi to other devices on the floor. Here are steps to enable Wi-Fi hotspot on Windows Laptops or desktops connected to a DSL broadband connection:


Note: I am assuming you have a normal broadband internet cable connection. Connect the Internet cable (with RJ-45 connector) to your Laptop or Desktop PC’s Ethernet port. Now you should see green or yellow light blinking on the Ethernet port indicating successful connection

Before you setup the Wi-Fi hotspot you need to setup your broadband internet connection: Read: How to setup Broadband cable Internet connection on Windows PC


Now follow these steps to setup your laptop’s wi-fi hotspot


  1. Press windows key + X >> Select “Command Prompt (Admin)”
    • Alternatively, press Windows and type “cmd” >> Right Click on “Command Prompt” and select “Run as administrator”
  2. Now in the Command Prompt, type: netsh wlan set hostednetwork mode=allow ssid=networkname key=password
    • (Replace “networkname” with any name and “password” with a password of your choice for your laptop Wi-Fi hotspot)
  3. Now type: netsh wlan start hostednetwork
  4. Now your hosted network will start but you will have to tweak some settings before accessing the internet
  5. Press Windows key and type “network connections” >> select “view network connections”
  6. Right click on the your active broadband connection and click “properties”
  7. Go to “Sharing” tab and click the check box to “Allow other network users to connect through this computer’s internet connection.”
  8. From the drop down select the newly created hosted connection (it could be named something like this- “Local Area Connection *12) >> Click Ok


Now you can connect other devices such as smartphones, tablets and laptops to the newly setup Wi-Fi hotspot using the password you assigned on step two above. If your Wi-Fi hotspot laptop goes to sleep, you will have to run command prompt as admin and again type: netsh wlan start hostednetwork

If the broadband connection on your Wi-Fi hotspot laptop is abruptly disconnected and reconnected, your Wi-Fi hotspot will stop working. To make it work again, turn off the Wi-Fi on your laptop (the one setup as a hotspot). Then turn it back on. Open command prompt as admin and type: netsh wlan start hostednetwork

Other important commands for Windows laptop hosted network are listed below:

To temporarily stop the Wi-Fi hotspot: netsh wlan stop hostednetwork

To again start Wi-Fi hotspot on your laptop: netsh wlan start hostednetwork

To allow or disallow hosted network:
netsh wlan set hostednetwork mode=allow
netsh wlan set hostednetwork mode= disallow

If you want to change your Wi-Fi hotspot network name (SSID) and password :
netsh wlan set hostednetwork ssid= newSSID
netsh wlan set hostednetwork key=newpassword


How to delete newly created Wi-Fi hotspot or wireless access point on Windows laptop

You can also permanently delete the newly created hosted network by following the steps below. Be very careful not to delete anything else than what has been instructed below

  1. Press Windows >> Type “regedit” >> Right click on it and select “run as administrator”
  2. Navigate to the following path in the Registry: HKEY_LOCAL_MACHINESystemCurrentControlSetServicesWlansvcParametersHostedNetworkSettings
  3. On the right, Right-click on HostedNetworkSettings key >> Click Delete
  4. Restart your laptop


After deleting the network from registry open Command Prompt as admin type: netsh wlan show hostednetwork. It will show you that hosted network is not configured. The last thing you have to do is go to “Network and Sharing” and set your broadband connection to its default settings. Here are the steps:

  1. Press Windows Key and type “view network connections” and click it
  2. Right click on your active broadband connection and select Propertites
  3. Go to sharing tab >> unselect “Allow other network users to connect throught this computer’s internet connection”
  4. Select OK


That’s it. Now the hosted network has been removed from your laptop’s network settings.

download now

Read More

Thursday, August 4, 2016

How to turn off sound and vibration in Android keyboard

How to turn off sound and vibration in Android keyboard


If you’ve just got your Android or have recently updated it, you might be getting this annoying pop sound and vibration while using your onscreen keyboard. It’s quite easy to disable keyboard sound and vibrate but most people look at the wrong place and can’t find the settings to turn it off. I remember I had it turned off in my Android KitKat but when I recently updated it to Lollipop the keypress sound was back again. Some people may like it but I like my Android silent and smooth. Also, the sound vibration and sound with keypress can drain your battery faster but not drastically. Here is how you can turn off keypress sound and vibrate in your Android smartphone or tablet:

How to disable (turn off) sound and vibration in Android keyboard 

The first place people look is in the “Sound and notification” setting but the correct place is “Language & input” setting. Here is how you can access it:

  1. Go to Settings  >> Language & Input 
  2. Under “Keyboard and input methods” select “Android Keyboard AOSP” or any keyboard you are using right now. 
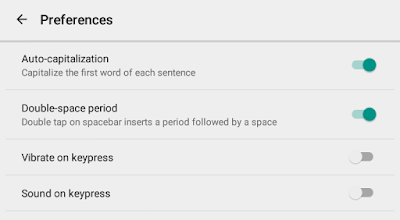
  3. From inside the android keyboard settings select “Preferences” >> Disable “Vibrate on keypress” and “Sound on keypress”
  4.  All done 

 There you go. Now you won’t get the annoying sound and vibration from your Android keyboard and save some battery life at the same time.


Accessing "Language & input" Setting.

Accessing "Android Keyboard Settings"

Disabling vibrate and sound on keypress


download now

Read More